The TimeLine works with all your existing Palettes. Any Scene, Dimmer, Color, Position, Movement, Shutter, Gobo, Zoom, Focus, Prism, Effect, or Pixel Strip Palette you have saved in SDC can be placed on the timeline as a cue. This means you build your looks the same way you always do - using the palette system - and then arrange them in time using the TimeLine.
Overview
The TimeLine is divided into three main areas:
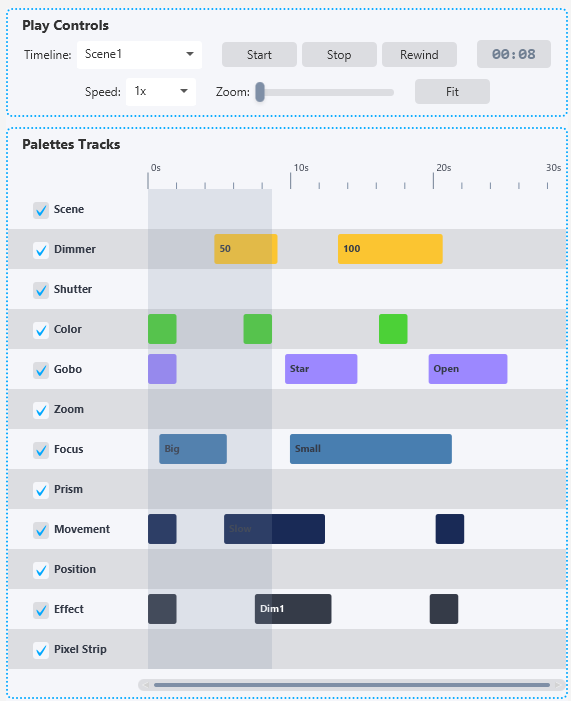
At the top are the Play Controls, where you select a timeline, control playback, adjust speed and zoom, and see the current time position.
In the middle are the Palettes Tracks, which is the visual timeline itself. This is where you see your cues arranged across 12 tracks (one for each palette type), with a ruler showing time and a horizontal scrollbar for navigation.
At the bottom are the editing sections: Enable Editing, General Options, Add TimeLine, Edit TimeLine, Add Cue, and Edit Cue. These let you create and manage timelines and add, edit, or delete individual cues.
Play Controls

The Play Controls bar at the top contains everything you need for playback:
Timeline: A dropdown to select which saved timeline to load. You must select a timeline before you can use the playback buttons.
Start / Pause: Starts playback from the current position. While playing, the button changes to "Pause". Pressing Pause freezes the timeline at its current position - any active fades are paused too. Pressing Start again resumes from where you paused.
Stop: Stops playback completely and resets the playhead to the beginning. All active fades are cancelled, all running effects that were triggered by the timeline are stopped, and all cues are reset so they will trigger again on the next playback.
Rewind: Jumps the playhead back to the beginning (time 0).
Time Display: Shows the current playback position in minutes and seconds (for example, "01:30" means 1 minute and 30 seconds).
Speed: Lets you change the playback speed. Options are 0.25x (quarter speed), 0.5x (half speed), 1x (normal), 2x (double speed), and 4x (four times speed). This is useful for previewing long timelines quickly, or for slowing down to check that cues are triggering at the right time.
Zoom: A slider that controls how zoomed in the timeline view is. Zooming in lets you see more detail and make more precise edits. Zooming out gives you an overview of the entire timeline.
Fit: A button that automatically zooms the timeline so the entire duration fits within the visible area.
Palettes Tracks
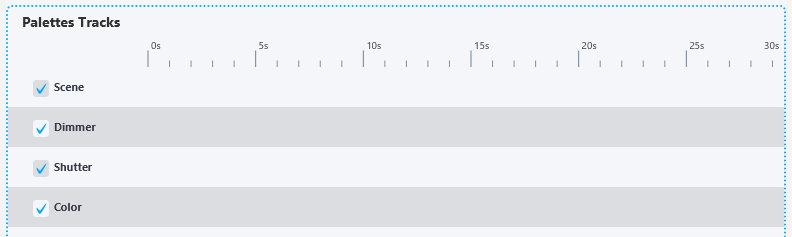
The Palettes Tracks area is the heart of the TimeLine. It consists of a time ruler across the top and 12 horizontal tracks stacked vertically, one for each palette type:
Scene, Dimmer, Shutter, Color, Gobo, Zoom, Focus, Prism, Movement, Position, Effect, Pixel Strip
Each track has a name label on the left side and a checkbox. The checkbox enables or disables that track during playback - a disabled track's cues will be skipped. This is useful for muting certain tracks while testing, for example disabling the Movement track while you work on color timing.
Cues appear as colored blocks on their respective tracks. Each cue type has its own color, making it easy to visually distinguish between different types of cues at a glance.
You can click on the time ruler to jump the playhead to any position. You can also click and drag on the ruler to scrub through the timeline.
During playback, a progress fill shows how far through the timeline you are. The playhead can be shown or hidden using the "Show playhead" option in General Options.
The horizontal scrollbar below the tracks lets you scroll through the timeline when you are zoomed in.
Working with Cues

Cues are the building blocks of a timeline. Each cue represents a single Palette being triggered at a specific time.
A cue has the following properties:
Type: Which palette track it belongs to (Scene, Dimmer, Color, etc.).
Palette: Which specific saved Palette to trigger.
Start: When the cue begins, in milliseconds from the start of the timeline.
Duration: How long the cue lasts, in milliseconds.
Fade: An optional fade time in milliseconds. When a cue has a fade time, the palette values fade in gradually instead of snapping on instantly. Fade is available for Scene, Dimmer, Color, and Position cues.
Every track also includes a special "auto" palette. For most tracks this is "Clear", which resets the values for that palette type. For Movement the auto palette is "Stop Movement" which stops any active pan/tilt movement. For Effect it is "Stop Effects" which stops all effects that were triggered by the timeline. For Pixel Strip it is "Stop Pixel Strip". These auto palettes are useful for cleaning up at the end of a timeline or resetting between sections.
Adding a Cue
To add a cue to the timeline:
1. Make sure "Enable editing of TimeLines & Cues" is checked.
2. In the "Add Cue" section, select a Type (which track the cue will go on).
3. Select a Palette from the dropdown. The available palettes are filtered based on the selected Type - for example, selecting "Scene" shows only your saved Scene palettes.
4. Set the Start time in milliseconds (for example, 5000 means the cue starts 5 seconds into the timeline).
5. Set the Duration in milliseconds (for example, 3000 means the cue lasts 3 seconds).
6. Optionally set a Fade time if supported for that cue type.
7. Click "Add Cue".
The cue appears on the corresponding track in the timeline view.
Editing a Cue
To edit an existing cue, click on it in the timeline view. The selected cue is highlighted, and its properties appear in the "Edit Cue" section at the bottom.
From the Edit Cue section you can change the Palette, Start time, Duration, and Fade time. Changes are applied immediately and you can see the cue update in the timeline view as you adjust the values.
You can also interact with cues directly on the timeline canvas when editing is enabled:
Dragging a cue moves it to a different start time. Click and hold the center of a cue block and drag it left or right.
Resizing a cue changes its duration. Hover near the left or right edge of a cue block - when the cursor changes, click and drag to extend or shorten the cue.
Double-clicking a cue selects it and opens it for editing.
To delete a cue, select it and click the "Delete Cue" button in the Edit Cue section.
Creating and Managing TimeLines

You can create multiple timelines and switch between them. Each timeline has its own set of cues, duration, and repeat setting.
Add TimeLine: To create a new timeline, go to the "Add TimeLine" section, enter a name, set the duration in seconds (5 to 600 seconds, default 30), choose whether it should repeat, and click "Add TimeLine". The new timeline is created and automatically selected.
Edit TimeLine: To change the duration or repeat setting of an existing timeline, select it in the "Edit TimeLine" section. You can adjust the duration with the spinner and toggle the Repeat checkbox. Changes are applied immediately.
Delete TimeLine: To delete a timeline, select it in the "Delete TimeLine" dropdown under General Options and click "Delete". A confirmation dialog will appear before the timeline is removed.
Default TimeLine: You can set a default timeline under General Options. The default timeline is automatically loaded when you open SDC. This is useful if you always start with the same timeline.
Repeat: When Repeat is enabled on a timeline, playback loops back to the beginning when it reaches the end. All cues reset and trigger again. Active fades are cancelled at the loop point. If Repeat is off, playback simply stops at the end.
Triggering TimeLines from Scene Faders
TimeLines can also be triggered from Scene Faders and the Palette tiles, just like any other Palette. This means you can start a timeline during a live show by pressing a button or moving a fader, combining manual control with automated sequences.
When a timeline is triggered from a Scene Fader, pressing Stop or triggering the auto "Stop" tile will stop the timeline playback.
Fade Transitions
Fade is one of the most powerful features of the TimeLine. When a cue has a fade time set, the palette values are gradually transitioned over the specified duration instead of snapping on instantly. This creates smooth, professional-looking transitions between lighting states.
Fade is supported for Scene, Dimmer, Color, and Position cues. Other cue types (Shutter, Gobo, Zoom, Focus, Prism, Movement, Effect, Pixel Strip) do not support fade - they trigger instantly when their start time is reached.
The fade time cannot exceed the cue's duration. If you set a fade time equal to the duration, the palette will spend the entire cue duration fading in.
For example, if you have a Scene cue with a duration of 5000ms and a fade time of 2000ms, the scene will fade in over the first 2 seconds and remain at full values for the remaining 3 seconds.
Tips
Start by creating your Palettes first. Build all the looks you want - scenes, dimmer levels, color states, positions - and save them as Palettes. Then use the TimeLine to arrange them in order and time.
Use the Speed control to preview your timeline faster. Set speed to 2x or 4x to quickly check if cues are in the right order and at the right times, then switch back to 1x for a real-time preview.
Use track checkboxes to isolate specific aspects of your show while editing. For example, uncheck everything except the Color track to focus on getting your color timing right, then enable the other tracks once you are happy.
The Fade feature works especially well for creating smooth scene transitions. Place two Scene cues back to back on the Scene track, and give the second cue a fade time to smoothly blend from one look to the next.
Remember that each cue triggers the palette just like pressing the palette button yourself. This means the same fixture selection rules apply - the cues affect whatever fixtures the palette was saved for.