Scene Faders are one of the core tools for live control in SDC. The idea is simple: you pre-program scenes during rehearsal or setup, and then during the show you use the faders to mix between them in real time. Each scene can be a complete snapshot of your lighting state - dimmer levels, colors, positions, effects, movement, pixel strip states, and even TimeLine playback - all captured in a single fader.
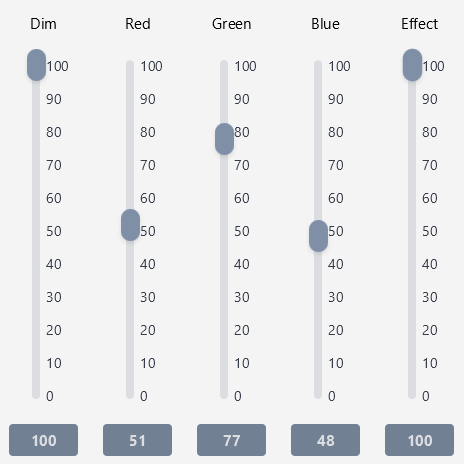
The fader is labeled with the scene name and goes from 0 to 100. At 0 the scene is inactive. Raise the fader and the scene comes to life.
How Scene Faders Work
The fader value controls what happens depending on the type of data stored in the scene:
Dimmer and color channels (RGB, White, Amber, UV) are mixed using HTP - Highest Takes Precedence. This means if two active scene faders both control the same dimmer channel, the higher value wins. As you raise a fader, its dimmer and color values scale proportionally from 0 to their saved values. As you lower it, they scale back down. If another fader has a higher value for that same channel, the output stays at the higher level until you bring that fader down too.
All other channels (gobos, prism, shutter, focus, and so on) snap to their saved values the moment the fader moves above 0. They do not scale with the fader position - they are either on or off.
Effects saved in the scene start when the fader moves above 0 and stop when it returns to 0. They do not scale with the fader level.
TimeLine playback starts when the fader moves above 0 and stops when it returns to 0.
Movement starts when the fader moves above 0. Returning to 0 stops the movement.
Position (static pan/tilt values) snaps to the saved position when the fader moves above 0.
Pixel Strip effects start when the fader moves above 0 and stop when it returns to 0. The fader level also controls the virtual dimmer on strip fixtures, so you can fade strip brightness up and down with the fader.
Using the Faders
Each scene fader has a vertical slider and a text field below it showing the current value. You can control the fader in three ways:
Drag the slider up or down with the mouse.
Click the text field and type a value directly, then press Enter.
Hover your mouse over the text field and use the scroll wheel to adjust the value. Scrolling changes the value in steps of 1. Hold Shift while scrolling to change in steps of 10. This also works with touchpads using two-finger scrolling.
Every scene fader is MIDI-mappable. You can assign a physical fader on your MIDI controller to any scene fader for hands-on tactile control during a live show.
Clear All
The right side of the Scene Faders page has a "Clear all" button. Pressing it sets every scene fader to 0 and resets all DMX channels that were being controlled by any active scene. This includes stopping all running effects, chases, movement, and TimeLine playback that were started by scene faders. It is a clean reset of everything the scene faders have been doing.
A/B Crossfader
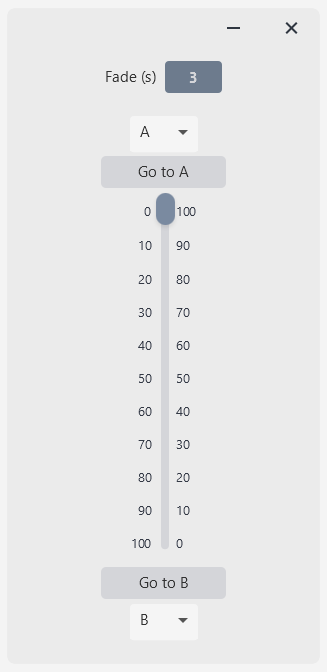
The A/B Crossfader gives you a single fader that crossfades between two saved scenes. You assign one scene to the A side and another to the B side, then move the fader to fade smoothly from one look to the other. Open it from the Scene Faders page with the “A/B Crossfade” button, located just below “Clear all” on the right side of the page. It opens a small floating window titled “SDC - A/B Crossfader” that stays on top of the main window.
The Crossfader Window
At the top is a “Fade (s)” field that sets the fade duration in seconds (default 3.0). Below it are a dropdown for choosing the scene on side A, a “Go to A” button, the vertical crossfade slider, a “Go to B” button, and a dropdown for choosing the scene on side B. Each dropdown lists all the scenes you have saved, shown by their scene name (or “Scene 1”, “Scene 2”, and so on if unnamed).
The slider runs from top to bottom. At the top, side A is at full (100) and side B is at 0. At the bottom, side A is at 0 and side B is at full (100). The two sides are always inverse - as one rises, the other falls. The numbers beside the slider show each side’s current level.
How the Crossfade Mixes
The two selected scenes are driven inversely by the slider, and their output is combined using HTP - Highest Takes Precedence. Where both scenes control the same channel, the higher value wins and holds steady as you cross, so there is no dip in the middle of the fade. Channels that belong to only one of the two scenes fade up and down with that scene’s level.
Using the Crossfader
Drag the slider to crossfade manually. To fade automatically, press “Go to A” or “Go to B” - the slider travels to that end over the time set in the “Fade (s)” field. Pressing the opposite Go button mid-fade reverses the fade from its current position, and grabbing the slider by hand cancels a running fade and hands control straight back to you. The crossfade slider and both Go buttons are MIDI-mappable, so you can run the crossfade from a physical fader and buttons on your controller.
Saving and Restoring
Your A and B scene picks, the slider position, the fade time, and the window position are all saved with your project and restored the next time you launch SDC. To change a side, pick a different scene from its dropdown; to leave a side empty, clear its selection. Pressing “Clear all” on the Scene Faders page resets the scene faders to 0 - the crossfader then waits until its computed levels catch up to the faders before driving them again, so nothing jumps unexpectedly.
Saving and Restoring
Scenes are created on the Save & Delete page. The controls you have active at the time of saving - fader levels, running effects, movement states, positions, colors - can be captured into the scene. For a full explanation of how saving works, see the Save & Delete how-to.
SDC remembers which scene faders were active and at what level when you close the application. The next time you launch SDC, the faders and their levels are restored automatically so your show picks up where you left off. This behavior can be toggled on or off with the "Restore Scene Faders" checkbox in Settings.
Tips
Scene faders shine in live situations where you need to crossfade between looks. Set up one scene with a warm stage wash and another with cool blue. Raise one while lowering the other for a smooth transition - the HTP mixing handles the crossfade naturally.
Combine scene faders with the TimeLine for powerful show control. Save a TimeLine playback into a scene, then use the fader to start and stop the timeline. This gives you one-fader control over complex timed sequences.
Multiple scene faders can be active at the same time. The HTP mixing ensures that dimmer and color channels combine cleanly, while effects and movement from different scenes run simultaneously.