The page is split into two halves. The left side shows the faders for the currently selected fixture type. The right side has the fixture selection panel with checkboxes, selection buttons, and fixture type buttons.
Fixture Type Selection
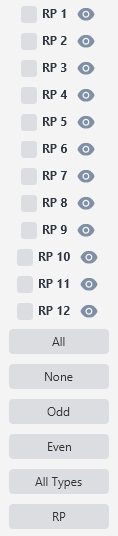
On the right side, below the fixture checkboxes, you will find a button for each fixture type in your project. Clicking a fixture type button switches the fader display to show only the channels for that fixture type. The fixture checkboxes update accordingly to show only the fixtures of the selected type.
An "All Types" button is also available. Clicking it displays the faders for all fixture types side by side. The channel labels above the faders are color-coded by fixture type, making it easy to tell which faders belong to which fixture type, if you selected a custom color when adding the fixture.
Fixture Selection
Using the checkboxes, you can choose which fixtures to control. When you move a fader, the change is applied to all checked fixtures of the currently displayed type. Four quick-selection buttons are provided: All (checks all fixtures of the current type), None (unchecks all), Odd (checks fixtures 1, 3, 5...), and Even (checks fixtures 2, 4, 6...).
Faders

There are three ways to set a fader value: drag the fader, type a value into the text field below the fader and press Enter, or hover over the text field and use the scroll wheel. Scrolling adjusts the value in steps of 1. Holding Shift while scrolling adjusts in steps of 10.
Hovering over a channel label shows a tooltip with the full channel name and the fixture type it belongs to - useful when you have many channels or are displaying all fixture types at once.
Virtual Dimmer Fader
If any fixture of the selected type has virtual dimmer enabled (selected when the fixture was added), an extra fader labeled "VDim" appears to the left of the channel faders. This fader controls the virtual dimmer level for all checked fixtures that use virtual dimmer. The virtual dimmer scales the RGB output without requiring a physical dimmer channel on the fixture - this is especially useful for RGB-only LED fixtures that don't have a dedicated dimmer channel. If the fixture's color channels are currently being controlled by an effect (such as a chase), the VDim fader stores the value without directly changing the output, so the effect is not disrupted.
Eye Icon

If you click the small eye icon to the right of a fixture's name and number, the faders update to show the current DMX channel values of that fixture.
This is especially handy when switching between fixture types. You can click a fixture type button, then click the eye icon on a specific fixture to load its current values into the faders before making adjustments.
Channel Name Abbreviations

The fader labels use abbreviated channel names to save space. The full channel name is always available in the tooltip. The abbreviations used are:
DimC = Dimmer Coarse, DimF = Dimmer Fine, Shut = Shutter, Red = Red, Green = Green, Blue = Blue, White = White, Amber = Amber, UV = UV, PanC = Pan Coarse, PanF = Pan Fine, TiltC = Tilt Coarse, TiltF = Tilt Fine. Any other channel name is truncated to five characters.
Tips
Use the eye icon to "load" a fixture's current state into the faders before making changes. This prevents accidental jumps when you start moving a fader that was at a different value than what the fixture is currently outputting.
The Odd and Even buttons are useful for creating split looks. Check "Odd", set a color, then check "Even" and set a different color - you instantly have an alternating pattern across your fixtures.
When working with multiple fixture types, the "All Types" view gives you a complete picture of every channel. The color-coded labels make it easy to identify which faders control which fixture type without needing to switch back and forth.