Dimmer Effects - Color Effects - Gobo Effects - Chases - Misc Effects

Before experimenting with effects, it is very important to note that some effects require fixtures loaded from a GDTF file with gobo and color attributes, as those effects use the attribute definitions from the file. The effects that depend on GDTF attributes are: Color W1 Effect 1, Color W1 Effect 2, Color W2 Effect 1, Color W2 Effect 2, Gobo W1 Effect, and Gobo W2 Effect.
The four RGB effects (RGB Color Wheel, RGB Color Wave, RGB Color Pattern, and RGB Pixel Mapper) do not require a GDTF file - they work directly with your fixture's RGB channels. When creating SDC or GDTF files for your fixtures, you must add the Red, Green, and Blue colors; otherwise, SDC won't know which channels to apply the color effect to.
We highly encourage using a GDTF file to unlock the full potential of SDC. If you don't have a GDTF file for your fixture, take a look at the post titled "How to Generate a GDTF File for SDC". It's not very difficult and won't take much time, since SDC only requires a very basic GDTF file.
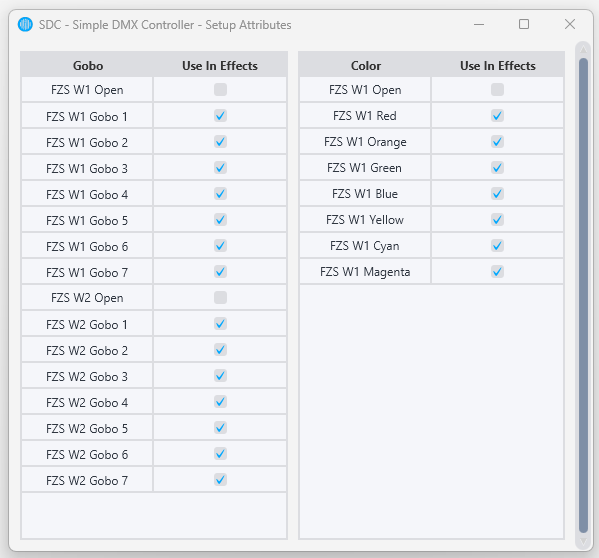
When working with fixtures imported from a GDTF file containing color and gobo attributes, you can quickly choose which attributes to use in the effects. Click on Views -> "Set attributes to use in effects", then check or uncheck the attributes you want to enable.
As with any other page in SDC, the fixture selection panel on the right side determines which fixtures the effects apply to:

If you click the small bulb icon to the right of a fixture name, that fixture will be turned on and all other fixtures will be turned off.
The best advice when working with effects is simply to play and have fun. Start an effect, use the faders and buttons to create a look you like. The effects are meant to be easy to use, but once you start experimenting, you'll see they offer plenty of creative freedom.
For dimmer effects, select the fixtures you want to apply the effect to and hit play. A useful trick is to open Fixture Levels (Views -> "Fixture Levels") at the same time, which gives you a great overview of fixture intensity:

Remember to turn up the Grand Master (G.M):

For all effects, you can always press "Reset" to return to default settings and start fresh.
Dimmer Effects
SDC has three dimmer effects plus two beat-driven flash effects: Dimmer BPM and Dimmer Kick. Each one can bring your fixtures to life with just a few clicks.
Dimmer Effect 1

Dimmer Effect 1 is ideal for dimmer effects that need to run in sync across multiple fixtures. It uses a single engine to control all selected fixtures synchronously.
Dimmer Effect 1 offers three modes: Sine fades the fixture smoothly up and down. Go Up fades the fixture up, then immediately drops to 0 and fades up again. Go Down fades down, then jumps back to the maximum value and fades down again.
All three modes share the same controls. The Range slider sets the low and high boundaries of the effect - if you don't want your fixtures to go completely dark, drag the low thumb up from 0. The Pause High and Pause Low values set how long the effect holds at the top and bottom of its cycle. The Speed fader controls how fast the effect runs.
The Offset value spreads the effect across your fixtures so they don't all pulse at the same time. Set it to "Normal" for evenly spaced offsets or "Random" for random phase across fixtures.
Dimmer Effect 2
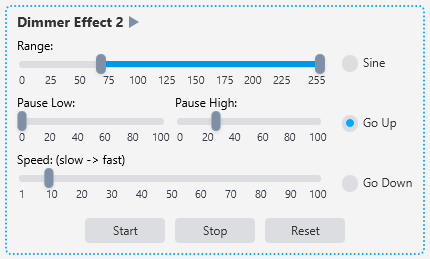
Dimmer Effect 2 looks similar to Dimmer Effect 1, but there is a crucial difference: while Dimmer Effect 1 uses a single engine to control all fixtures synchronously, Dimmer Effect 2 gives each fixture its own independent effect engine. This means you can make the effect run faster on some fixtures and slower on others, or have odd-numbered fixtures fade up while even-numbered fixtures fade down. Dimmer Effect 2 offers the same modes (Sine, Go Up, Go Down) and the same controls for Range, Pause Low, and Pause High.
Dimmer Effect 3
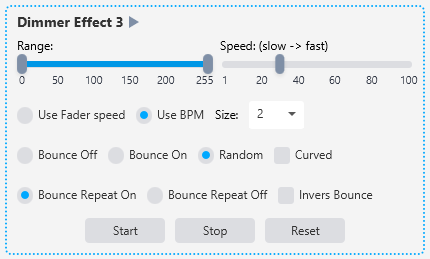
Dimmer Effect 3 works differently - it does not fade the dimmer up and down. Instead, it turns fixtures on and off in sequence, similar to a classic chase effect. You can set the speed with the speed fader or sync the changes to the beat of the music with "Use BPM". The Size setting controls how many fixtures are active at once. The Bounce option determines what happens when the effect reaches the end of the fixture sequence - it can either start over from the beginning or bounce back in the opposite direction. A strobe-like effect can be created by using "Random", setting the speed high, and adjusting the size to fit your fixture count.
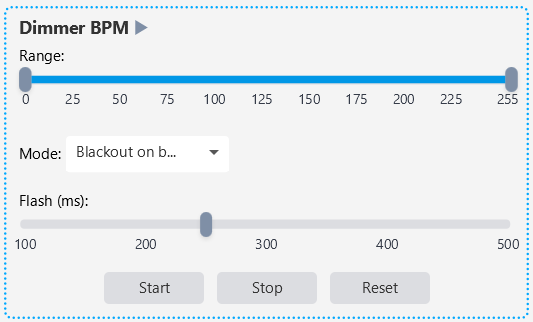
Dimmer BPM
Dimmer BPM flashes your fixtures in time with the tempo. The Range slider sets the low and high dimmer levels — if you don’t want the fixtures to go completely dark, raise the low thumb. The Mode dropdown chooses the flash direction: “Blackout on beat” rests the fixtures bright and drops them dark on each beat, while “Flash on beat” rests them dark and flashes them bright. The Flash (ms) slider sets how long each flash is held, from 100 to 500 milliseconds. Start, Stop, and Reset control the effect, and the tempo follows the global Tap Tempo / BPM.
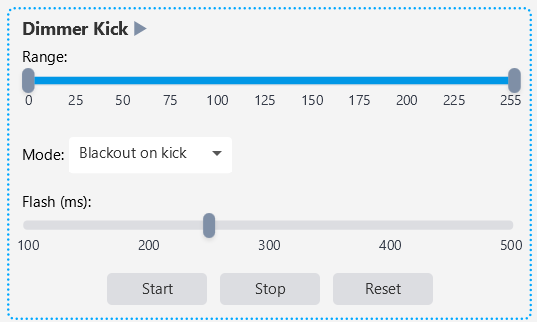
Dimmer Kick
Dimmer Kick works exactly like Dimmer BPM, but instead of following the tempo it flashes on each kick detected by the Kick Analyser. Make sure the Kick Analyser is running and tuned to the music, then start Dimmer Kick to drive your fixtures straight from the kick drum. The controls are identical: a Range slider for the low and high levels, a Mode dropdown (“Blackout on kick” or “Flash on kick”), a Flash (ms) slider for the flash length (100–500 ms), and Start, Stop, and Reset buttons.
Like all dimmer effects, both Dimmer BPM and Dimmer Kick can be saved into Palettes and Scene Faders for instant recall during a show.
Color Effects
The Color Effects category contains eight effects. The first four are RGB effects that work with any fixture that has Red, Green, and Blue channels. The remaining four are color wheel effects that require GDTF attribute definitions.
The display order in the Color Effects category is: RGB Pixel Mapper, RGB Color Wave, RGB Color Wheel, RGB Color Pattern, Color W1 Effect 1, Color W1 Effect 2, Color W2 Effect 1, Color W2 Effect 2.
RGB Pixel Mapper
The RGB Pixel Mapper is SDC's most advanced RGB effect. Unlike the other RGB effects, which treat your fixtures as a simple left-to-right line, the Pixel Mapper lets you position your fixtures in 2D space - matching how they are physically arranged on your stage. The effect then paints color patterns across that 2D layout, so what you see in the preview matches what happens on your actual rig.
This makes the Pixel Mapper especially powerful if your fixtures are arranged in a grid, a circle, an arc, or any custom shape. It is also very effective with LED strips and large numbers of RGB fixtures.
Getting Started
The Pixel Mapper has two main parts: the effect controls in the main SDC window, and the Position Fixtures window where you arrange your fixtures on a canvas.
To get started:
1. Select the fixtures you want to use (make sure they are checked in the right panel).
2. Click the "Position Fixtures" button to open the fixture positioning window.
3. Click "Enable Editing" in the positioning window.
4. Click "Add" to place your selected fixtures on the canvas. New fixtures appear at the bottom of the canvas in a neutral zone.
5. Drag fixtures to match their real-world positions on your stage.
6. Choose an effect, adjust the settings, and press Start.
The Position Fixtures Window
The Position Fixtures window shows a canvas where your fixtures are displayed as colored dots. When the effect is running, the canvas shows a live preview of the effect — you can see exactly what colors your fixtures will display.
At the bottom of the window you will find several editing buttons. All editing buttons require "Enable Editing" to be toggled on before they become active.
Enable Editing: Toggles editing mode on and off. When editing is enabled, you can select and drag fixtures on the canvas. When editing is off, the canvas is locked to prevent accidental changes.
Add: Adds all currently selected fixtures (from the right panel in the main SDC window) to the canvas. Newly added fixtures appear in a row at the bottom of the canvas. Fixtures that are already on the canvas are not added again.
Remove: Removes the selected fixtures from the canvas. Select fixtures by clicking on them (hold Ctrl/Cmd to select multiple) or by drawing a selection rectangle around them.
Align Grid: Resets all fixtures on the canvas to an automatic grid layout. This is useful if you want to start fresh with positioning.
Align Vertical: Aligns all selected fixtures to the same vertical position (same X coordinate). Useful for creating straight columns.
Align Horizontal: Aligns all selected fixtures to the same horizontal position (same Y coordinate). Useful for creating straight rows.
Sort Selected: Sorts the currently selected fixtures in order. This is useful if your fixtures were added out of order and you want to make sure they follow a logical sequence.
Straighten: Straightens the selected fixtures into an even line, keeping the start and end positions but distributing the fixtures evenly between them.
Rotate Left / Rotate Right: Rotates the selected fixtures 15 degrees around their center point. Useful for creating angled arrangements or arcs.
To select fixtures on the canvas, click on a fixture dot. Hold Ctrl (or Cmd on Mac) to add more fixtures to the selection. You can also draw a selection rectangle by clicking and dragging on an empty area of the canvas. Selected fixtures are highlighted.
To move fixtures, simply drag them to their new position. If you have multiple fixtures selected, dragging one will move them all together.
Fixture positions are saved with your SDC project, so you only need to arrange them once.
Effect Controls
The main SDC window shows the effect settings for the Pixel Mapper. At the top you will find the Effect and Direction dropdowns, along with the "Position Fixtures" button. Below that are settings specific to the selected effect, and at the bottom is the Speed fader.
Effect: Selects which visual pattern to use. The available effects are Rainbow Wave, Sweep, Spiral, and Plasma. Each effect has its own set of controls that appear when the effect is selected.
Direction: Controls the direction of the effect. The available directions are: Horizontal, Horizontal (Reverse), Vertical, Vertical (Reverse), Diagonal, Diagonal (Reverse), Radial, and Radial (Reverse). Direction is disabled for the Spiral and Plasma effects, as these have their own built-in movement patterns.
Speed: Controls how fast the effect animates. This fader is shared across all effect types.
Rainbow Wave
Rainbow Wave paints a smooth, flowing rainbow gradient across your fixtures based on their 2D position. The rainbow cycles through the full color spectrum and moves continuously in the chosen direction.
Amplitude: Controls the color saturation of the rainbow. At full value, the colors are vivid and fully saturated. Lowering the amplitude reduces the saturation, making the colors appear more washed out or pastel.
Wavelength: Controls how much of the color spectrum is visible across your fixtures at any given moment. A low wavelength means only a small portion of the rainbow is visible (all fixtures are close in color), while a high wavelength stretches the full spectrum across your rig.
Rainbow Wave is a great starting point - set the Direction to Radial for a classic expanding rainbow circle, or Horizontal for a flowing wash across your rig.
Sweep
Sweep creates a moving band of color that sweeps across your fixtures. Imagine a spotlight or a bar of light moving across your stage.
Base Color: The color of the moving band. Choose from a wide palette of predefined colors including standard colors like Red, Green, Blue, Cyan, Magenta, and Yellow, as well as many variations like Scarlet, Amber, Turquoise, Indigo, and more.
Background Color: The color shown where the sweep band is not.
Width: Controls how wide the sweep band is. A low value creates a narrow beam of color, while a high value creates a wide wash.
The combination of Base Color and Background Color gives you a lot of creative flexibility. For example, a Cyan sweep over a Black background creates a striking beam effect. A warm Orange sweep over a deep Blue background can look like a sunset moving across your lights.
Spiral
Spiral creates a rotating spiral pattern that radiates from the center of the canvas. The colors spin around the center point, creating a hypnotic, dynamic effect.
Tightness: Controls how tight or loose the spiral coils are. A low value creates wide, open spirals with large color bands. A high value creates tighter spirals with more coils visible.
Arms: Sets the number of spiral arms, from 1 to 8. One arm creates a single rotating spiral. Two arms create a pattern like a pinwheel. More arms create increasingly complex patterns.
Inward Spiral: When unchecked (the default), the spiral expands outward from the center. When checked, the spiral contracts inward toward the center.
The Direction dropdown is disabled when Spiral is selected. The speed fader controls the rotation speed. Spiral works especially well when your fixtures are arranged in a circle or a grid.
Plasma
Plasma creates an organic, constantly-shifting pattern of blended colors. It looks like liquid colors flowing and mixing together, similar to a lava lamp. Of all the Pixel Mapper effects, Plasma creates the most complex and organic-looking visuals.
Color Palette: Selects the color theme. The available palettes are: Rainbow (full spectrum), Fire (red and yellow), Ocean (blue and cyan), Forest (green and yellow), Sunset (purple/magenta and orange), and Ice (white and cyan).
Layers: Controls the complexity of the plasma pattern, from 2 to 8 layers. More layers create a more complex, detailed pattern.
Turbulence: Controls how chaotic the plasma pattern is. A low value creates a smooth, gently flowing pattern. A high value creates a more turbulent, rapidly shifting pattern.
The Direction dropdown is disabled when Plasma is selected. For a subtle, ambient look, try a low Turbulence with 2-3 Layers. For a more dramatic, active pattern, increase both. The Fire and Ocean palettes are especially effective for themed events.
The Pixel Mapper preview in the Position Fixtures window runs in real time, so you can see the effect as you adjust settings. Use this to fine-tune your look before going live. Remember that the position of your fixtures on the canvas matters - take the time to arrange them to match your real stage layout for the best results.
RGB Color Wave

RGB Color Wave creates smooth, flowing color animations across your fixtures. Think of it as waves of color washing over your lights - each fixture shows a slightly different color at any given moment, creating a sense of motion and depth.
RGB Color Wave has four faders and three dropdown menus:
Speed controls how fast the color wave moves across your fixtures. The wave animation is always smooth - changing the speed won't cause any jumps or glitches.
Offset controls how much color separation there is between each fixture. At 0, all fixtures show nearly the same color at the same time. As you increase the offset, each fixture shows a different part of the color wave, creating more visual spread across your rig. This is one of the most important faders for this effect - even a small amount of offset can make a big difference.
Amplitude controls the intensity range of the color variation. At 100 (the default), colors go through their full range. Lowering the amplitude reduces the variation, making the colors more subtle and washed out.
Sharpness controls how crisp the color transitions are. At 0 (the default), colors blend softly into each other. As you increase sharpness, the transitions between colors become more defined and harder.
Wave Type determines the shape of the color animation: Sine (default) gives smooth, organic transitions. Square creates sharp, instant changes between colors. Sawtooth creates a sharp rise followed by a gradual fade - with RGB color mode, this creates beautiful clean color bands that overlap and blend. Triangle gives linear transitions up and down, similar to Sine but with straight-line fades.
Color Mode lets you choose which colors are included in the wave: RGB (default) gives you the full rainbow. RG creates warm tones from red through yellow to green. RB creates tones from red through magenta to blue. GB creates cool tones from green through cyan to blue. Warm cycles through red, orange, and yellow. Cool cycles through cyan, blue, and purple. Pastel gives the full rainbow range but with soft, low-saturation colors.
Direction controls which way the wave flows: Left To Right or Right To Left.
A quick tip: set the Wave Type to Sine, Color Mode to RGB, increase the Offset to around 30-50, and press Start. From there, experiment with the speed and try different Color Modes. If you want more defined color bands, increase the Sharpness. If you want a more subtle look, lower the Amplitude.
RGB Color Wheel

RGB Color Wheel creates a continuously rotating rainbow effect across your fixtures. Imagine a color wheel spinning - all your fixtures cycle through the full spectrum of colors together. This is the simplest of the RGB color effects, and it's a great starting point for adding color movement to your show.
RGB Color Wheel has five faders:
Tint adds white to the colors. At 0, the colors are fully saturated. As you increase the tint, the colors become lighter and more pastel.
Offset controls how much color separation there is between each fixture. At 0, all fixtures show the same color and rotate together. As you increase the offset, the colors spread out - each fixture shows a different position on the color wheel, creating a rainbow across your rig.
Shade adds black to the colors. At 0, the colors are at full brightness. As you increase the shade, the colors become darker.
Tone adds gray to the colors. At 0, the colors are fully saturated. As you increase the tone, the colors become more muted and grayish. The difference between Tone and Tint is that Tone desaturates toward gray, while Tint desaturates toward white.
Speed controls how fast the color wheel rotates.
Understanding the difference between Tint, Shade, and Tone: Tint is pure color + white = lighter, pastel color. Shade is pure color + black = darker color. Tone is pure color + gray = muted, desaturated color. These three controls give you a lot of flexibility in shaping the feel of the color effect without changing the speed or the color rotation itself.
A quick tip: increase the Offset to spread the rainbow across your fixtures, adjust the Speed, and press Start. If the colors are too intense, use the Tint fader to soften them. If you want darker, moodier colors, increase the Shade.
RGB Color Pattern
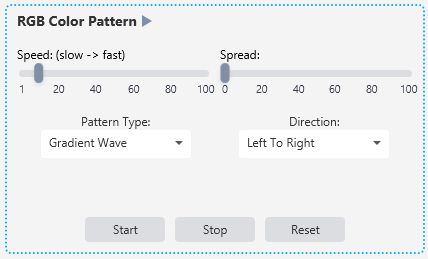
RGB Color Pattern offers structured, pattern-based color effects that go beyond simple color cycling. While RGB Color Wave and RGB Color Wheel focus on smooth, continuous color movement, RGB Color Pattern creates distinct visual patterns across your fixtures.
RGB Color Pattern has two faders and two dropdown menus:
Speed controls how fast the pattern animates.
Spread controls how spread out the pattern is across your fixtures. At 0, the pattern is compressed and the colors are close together. As you increase the spread, the pattern stretches out. The effect of the Spread fader depends on which Pattern Type is selected.
Pattern Type determines the kind of pattern:
Gradient Wave: A smooth color gradient that flows across your fixtures. The Spread fader controls how much of the color spectrum is visible - a low spread means all fixtures are close in color, while a high spread creates a wide rainbow.
Alternating: Fixtures alternate between two complementary colors that slowly rotate over time, so the pair is always changing.
Mirror: The color pattern mirrors from the center outward, so the left half mirrors the right half. This creates a symmetrical look especially effective when fixtures are in a line or arc. When Mirror is selected, the Direction dropdown changes to offer Inside Out and Outside In instead of Left To Right and Right To Left.
Rainbow Spread: The full rainbow spectrum is spread evenly across all fixtures and rotates over time. A subtle brightness wave adds extra dimension. The Spread fader controls the intensity of the brightness wave.
Direction controls the direction of the animation: Left To Right or Right To Left. When the Pattern Type is set to Mirror, the options change to Inside Out and Outside In.
A quick tip: start with Gradient Wave, increase the Spread to around 30-50, and press Start. Then try Alternating for a structured two-color look, or Mirror for a symmetrical effect. Rainbow Spread is great when you want a simple, always-moving rainbow across your entire rig.
Color W1 (Wheel 1) Effect 1
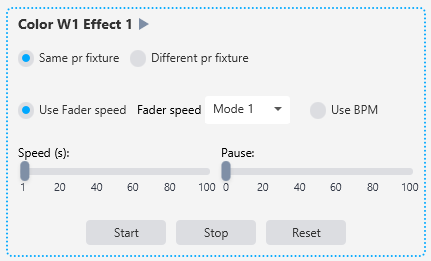
Color W1 Effect 1 is a step chase that changes color wheel attributes (from the GDTF file) at the speed you set. The speed fader has two modes: Mode 1 controls the time in seconds between each color change, Mode 2 controls speed from slow to very fast. For RGB fixtures loaded from a GDTF file, the color attributes are not traditional color wheel positions but color presets - these allow for very fast changes, and Mode 2 works well here.
You can sync the effect to the beat of the music with "Use BPM". If you don't want the same color on all selected fixtures, enable "Different per fixture". The Pause fader sets a pause duration when the effect has cycled through all colors.
Color W2 (Wheel 2) Effect 1 functions exactly like Color W1 Effect 1, except it changes colors on Wheel 2.
Color W1 (Wheel 1) Effect 2
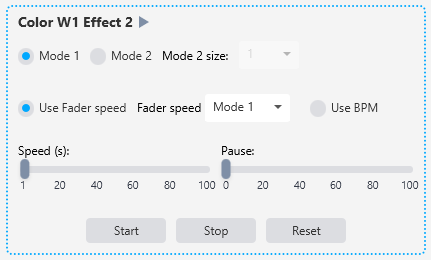
Color W1 Effect 2 works like a chase where the color changes one fixture at a time in ascending order. You can set the Size to change multiple fixtures at once. The same speed modes apply - Mode 1 for time in seconds, Mode 2 for speed control. For RGB fixtures loaded from a GDTF file, the color presets allow for very fast changes, and Mode 2 is beneficial here. The Pause fader adds a pause after all fixtures have been cycled. The effect can also sync to music via "Use BPM".
Color W2 (Wheel 2) Effect 2 functions exactly like Color W1 Effect 2, except it changes colors on Wheel 2.
Gobo Effects
The Gobo Effects category contains two effects, both requiring GDTF gobo wheel attributes.
Gobo W1 Effect

Gobo W1 Effect is a step chase for Gobo Wheel 1 that cycles through the gobo positions defined in your GDTF file. It works similarly to the color wheel effects, with speed and BPM controls.
Gobo W2 Effect
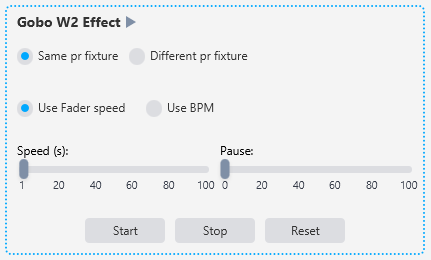
Gobo W2 Effect is the same as Gobo W1 Effect but for Gobo Wheel 2.
Chases
The Chases category contains three types of chase engines: Snap Chases, Fade Chases, and Manual Snaps. The number of snap and fade chases available is configurable in Settings. Before using chases, see the Save & Delete how-to to learn how to prepare chase steps.
Snap Chases
Snap chases switch between pre-saved steps instantly with no fading. Each snap chase can be loaded with a chase sequence you have saved on the Save & Delete page. The speed fader and BPM sync control the timing between steps.

Fade Chases
Fade chases transition smoothly between pre-saved steps with a crossfade. Like snap chases, they are loaded with saved chase sequences and offer speed and BPM controls.

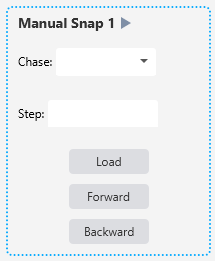
Manual Snap 1 & 2
Two manual snap chases that let you step through chase sequences manually rather than automatically. These give you direct control over when each step fires and is usefull when editing chases.
Misc Effects
The Misc Effects category contains one effect.
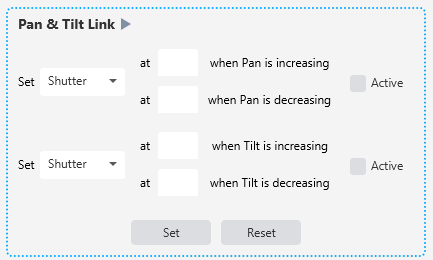
Pan & Tilt Link
Pan & Tilt Link lets you link fixture attributes to the pan and tilt movement. You select an attribute to control (Shutter, Dimmer, Color 1, Gobo 1, or Gobo 2), then set what value that attribute should be at when pan or tilt is increasing and when it is decreasing. This creates dynamic looks where, for example, the gobo changes depending on the direction the fixture is moving, or the shutter opens when panning left and closes when panning right. Each link has a checkbox to enable or disable it, and the effect has Set and Reset buttons to apply or clear the configuration.
Saving Effects
All effect settings can be saved as Palettes or Scene Faders for instant recall during a show. Set up the effects you like, then go to Save & Delete and save them. This is the intended workflow in SDC - experiment with effects during programming, save the looks you want, then use Palettes and Scene Faders to recall them live.
Tips
Open Fixture Levels (Views -> "Fixture Levels") while working with dimmer effects. It gives you a real-time visual overview of intensity across all your fixtures, making it much easier to see what the effect is doing.
The Offset control in Dimmer Effect 1 is one of the quickest ways to make a group of fixtures look dynamic. Even a simple sine wave becomes much more interesting when the fixtures are offset from each other.
Dimmer Effect 2's per-fixture independence is powerful for creating asymmetric looks. Try setting different speeds on odd and even fixtures, or have some going up while others go down.
The RGB effects (Pixel Mapper, Color Wave, Color Wheel, Color Pattern) work with any fixture that has RGB channels - no GDTF file needed for these. The Color W1/W2 and Gobo effects are the ones that need GDTF attributes.
For chases, preparation is key. Set up and save your chase steps on the Save & Delete page first, then load them into the chase engines on the Effects page.